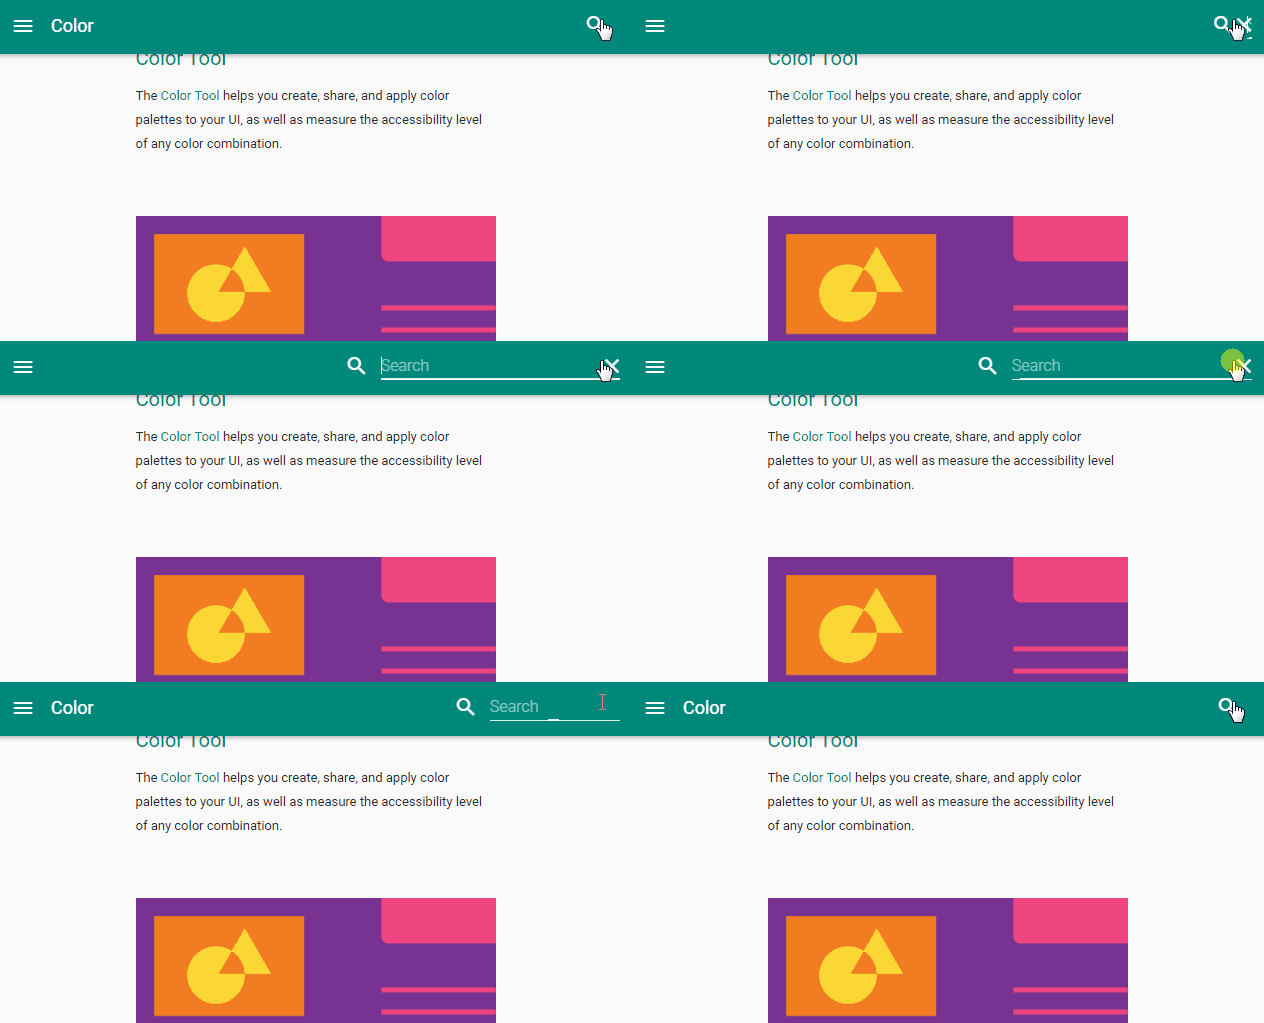
Googleマテリアルデザインのヘッダーにあるような検索フォームを作る方法です。
Googleマテリアルデザインの検索フォームとは
はじめに以下がGoogleマテリアルデザインの検索フォームです。

画面右上にある🔍アイコンを押すと検索フォームが右から左へ出現し、❌アイコンを押すと検索フォームが元の位置へ戻ります。
Demo
そして以下が完成したものです。
🔍アイコンを押してみて下さい。先程のように検索フォームが右から左へ出現しますよねぇ?
それでは作っていきましょう。
準備
<head></head>内に以下のCDNを読み込んでください。
Bootstrap4
今回は勉強がてらBootstrapを使いました。
<link rel="stylesheet" href="https://cdnjs.cloudflare.com/ajax/libs/twitter-bootstrap/4.0.0-beta/css/bootstrap.css">FontAwesome
アイコンはFontAwesomeの中から使用します。
<link rel="stylesheet" href="https://cdnjs.cloudflare.com/ajax/libs/font-awesome/4.7.0/css/font-awesome.css">これで準備完了です。
HTML
初めにHTMLを書きます。<body></body>内に以下のコードを書いて下さい。
<div class="w-100 bg-dark d-flex justify-content-between align-items-center p-2"> <button class="btn bg-transparent text-white"><i class="fa fa-bars" aria-hidden="true"></i></button> <h1 class="text-white">LOGO</h1> <div class="d-flex search-wrap position-relative"> <form action="#" id="form" class="position-absolute d-flex form h-100"> <button id="search-btn" class="btn search-btn bg-transparent border-0 text-white"><i class="fa fa-search" aria-hidden="true"></i></button> <input placeholder="Search..." id="search-text" class="search-text bg-transparent"> <span id="text-under-line" class="text-under-line position-absolute"></span> </form> <button id="close-btn" class="btn btn-danger close-btn bg-transparent border-0"></button> </div> </div>ポイント
上記のコード中にある以下の箇所が検索フォームに関わる要素です。
<div id="search-wrap" class="d-flex search-wrap position-relative"> <form action="#" id="form" class="position-absolute d-flex form h-100"> <button id="search-btn" class="btn search-btn bg-transparent border-0 text-white"><i class="fa fa-search" aria-hidden="true"></i></button> <input placeholder="Search..." id="search-text" class="search-text bg-transparent"> <span id="text-under-line" class="text-under-line position-absolute"></span> </form> <button id="close-btn" class="btn btn-danger close-btn bg-transparent border-0"></button> </div><i class="fa fa-search" aria-hidden="true"></i>はFontAwesomeの 🔍 アイコンです。
#text-under-lineはラインアニメーションを実装するために必要な要素です。
#close-btn内はJavaScriptでアイコン要素を挿入するため敢えて空にしています。
.d-flexやposition-relative等はBootstrapで用意されているクラスです。これについては公式サイトに詳しく説明されています。
CSS (SCSS)
続けて以下のCSSを書きます。
button { cursor: pointer; } input, button { outline: none; } .form { overflow: hidden; //.formの領域からはみ出た部分を隠す top: 0; right: 50%; //虫眼鏡が現在地からそのまま移動するように調節 transition: all 0.1s linear; width: 0; } .close-btn { z-index: 2; } .search-text { border: none; border-bottom: 1px solid white; width: 100%; //absoluteで左右ぴったりに配置するために100%にしている。100%にしないとラインが引かれない &:focus ~ .text-under-line {//フォーカスされるとラインが広がるようにする transform: scaleX(1); } } .text-under-line { border-bottom: 2px solid white; height: 2px; bottom: 0; transition: all 0.1s linear; transform: scaleX(0);//始めはラインを隠す }ポイントは以下の通りです。
.formは初期設定としてoverflow:hidden;で.formの領域からはみ出た部分を隠し、width:0;で幅を無くします。更にright:50%;で検索フォームが出現する際に 🔍 アイコンが現在地からそのまま移動するように調節します。
.search-textと.text-under-lineについては後述します。
JavaScript
最後に以下のJavaScriptを書きます。
(function() { const searchBtn = document.getElementById("search-btn"); const searchText = document.getElementById("search-text"); const closeBtn = document.getElementById("close-btn"); const form = document.getElementById("form"); const textUnderLine = document.getElementById("text-under-line"); closeBtn.innerHTML = '<i class="fa fa-search" aria-hidden="true"></i>'; function getPropertyValue(elem, property) { //ブラウザが示す要素の厳密なサイズを取得 const computedStyle = elem.currentStyle || document.defaultView.getComputedStyle(elem, ""); //currentStyleはIE,getComputedStyleはそれ以外 const propertyValue = computedStyle.getPropertyValue(property); return propertyValue; } closeBtn.addEventListener( "click", e => { e.preventDefault(); form.classList.toggle("is-open"); if (form.classList.contains("is-open")) { closeBtn.innerHTML = '<i class="fa fa-times" aria-hidden="true"></i>'; searchText.style.width = "auto";//#search-textのブラウザが示す小数点を含む幅を取得するためにwidthをautoにする //searchText.style.width = searchText.offsetWidth + 'px'; const searchTextWidth = getPropertyValue(searchText, "width");//#search-textのブラウザが示す小数点を含む幅を取得する const searchBtnWidth = getPropertyValue(searchBtn, "width");//#search-btnのブラウザが示す小数点を含む幅を取得する //console.log(parseFloat(searchTextWidth) + parseFloat(searchBtnWidth)); form.style.width = parseFloat(searchTextWidth) + parseFloat(searchBtnWidth) + "px";//#search-textの幅+#search-btnの幅を#formの幅にしてtransitionが効くようにする。width:auto;では効かないためこのようなことをしている。 textUnderLine.style.width = searchTextWidth;//#text-under-lineの幅を#search-textの幅にする //leftとrightで左右ぴったりに配置 textUnderLine.style.left = searchText.getBoundingClientRect().left - searchBtn.getBoundingClientRect().left + "px"; //#search-btnの座標から数えた#search-textの相対座標※追記:rightのみでも良かった textUnderLine.style.right = 0 + "px"; form.style.right = 0; //#formの右端を×アイコンの右端に揃える searchText.focus();//自動でフォーカスする } else { closeBtn.innerHTML = '<i class="fa fa-search" aria-hidden="true"></i>'; searchText.style.width = ""; //position:absolute;で配置しているため、閉じる直前に指定しないとぴったりと収まっていないため、吸収場所がボタン領域内ではなく画面外となってしまう。 textUnderLine.style.width = ""; textUnderLine.style.left = "";//追記:書かなくても動作した textUnderLine.style.right = "";//追記:書かなくても動作した form.style.width = ""; form.style.right = ""; searchText.blur();//フォーカスを解除する } }, false ); })();ポイントは以下の通りです。上から順に確認していきましょう。
始めは 🔍アイコンを表示する
#close-btnは検索フォームを開く&閉じる役割を担います。したがって始めは 🔍アイコンを表示します。
closeBtn.innerHTML = '<i class="fa fa-search" aria-hidden="true"></i>';🔍アイコンを押すと検索フォームが開くようにする
#close-btnが押されたときに検索フォームに.is-openクラスが追加されていれば ( 🔍アイコン が押されたとき)検索フォームが開くようにします。
form.classList.toggle("is-open"); if (form.classList.contains("is-open")) {検索フォームが開いたら閉じるときに備えて🔍アイコンから ❌アイコンに切り替えます。
closeBtn.innerHTML = '<i class="fa fa-times" aria-hidden="true"></i>';検索フォームをアニメーションさせながら出現させたいのですが、変化後の値がwidth:auto;ではtransitionが効きません。pxや%であれば効きますが、自然にブラウザが算出したサイズでアニメーションさせながら出現させたいので以下のように工夫します。
searchText.style.width = "auto";//#search-textのブラウザが示す小数点を含む幅を取得するためにwidthをautoにする const searchTextWidth = getPropertyValue(searchText, "width");//#search-textのブラウザが示す小数点を含む幅を取得する const searchBtnWidth = getPropertyValue(searchBtn, "width");//#search-btnのブラウザが示す小数点を含む幅を取得する form.style.width = parseFloat(searchTextWidth) + parseFloat(searchBtnWidth) + "px";//#search-textの幅+#search-btnの幅を#formの幅にしてtransitionが効くようにする。width:auto;では効かないためこのようなことをしている。上記のコードにあるgetPropertyValue()関数については以下の通りです。
function getPropertyValue(elem, property) { //ブラウザが示す要素の厳密なサイズを取得 const computedStyle = elem.currentStyle || document.defaultView.getComputedStyle(elem, ""); //currentStyleはIE,getComputedStyleはそれ以外 const propertyValue = computedStyle.getPropertyValue(property); return propertyValue; }続けて検索フォームが出現すると同時にラインアニメーションを行われるようにします。ラインアニメーションはテキストボックスに適用します。
ラインアニメーションに関するCSSは以下の通りです。
.search-text { border: none; border-bottom: 1px solid white; &:focus ~ .text-under-line {//フォーカスされるとラインが広がるようにする transform: scaleX(1); } } .text-under-line { border-bottom: 2px solid white; height: 2px; bottom: 0; transition: all 0.1s linear; transform: scaleX(0);//始めはラインを隠す }テキストボックス.search-textには1pxの下線を引き、その線の上に2pxの線に見立てた要素.text-under-lineを重ねて配置します。また.text-under-lineはtransform: scaleX(0);で隠しておきます。
次にラインアニメーションに関するJavaScriptは以下の通りです。
textUnderLine.style.width = searchTextWidth;//#text-under-lineの幅を#search-textの幅にする //leftとrightで左右ぴったりに配置 textUnderLine.style.left = searchText.getBoundingClientRect().left - searchBtn.getBoundingClientRect().left + "px"; //#search-btnの座標から数えた#search-textの相対座標 textUnderLine.style.right = 0 + "px"; form.style.right = 0; //初期設定で#formの位置のズレを解消これでラインアニメーションの実装は終わりです。
最後に 以下のコードで🔍アイコンが押されると自動でフォーカスされ、検索フォームが出現すると同時にラインアニメーションが行われるようになります。
searchText.focus();//自動でフォーカスする❌アイコン を押すと検索フォームが閉じるようにする
#close-btnが押されたときに検索フォームに.is-openクラスが追加されていなければ ( ❌ アイコン が押されたとき)検索フォームが閉じるようにします。
検索フォームが閉じたら#close-btnのアイコンを 🔍に戻します。
closeBtn.innerHTML = '<i class="fa fa-search" aria-hidden="true"></i>';続けて検索フォームが開いたときに追加されたstyle属性を全て削除します。
searchText.style.width = ""; //position:absolute;で配置しているため、閉じる直前に指定しないとぴったりと収まっていないため、吸収場所がボタン領域内ではなく画面外となってしまう。 textUnderLine.style.width = ""; textUnderLine.style.left = "";//追記:書かなくても動作した textUnderLine.style.right = "";//追記:書かなくても動作した form.style.width = ""; form.style.right = "";最後にテキストボックスのフォーカスを解除すれば完成です。
searchText.blur();//フォーカスを解除する出来た。。。
おわりに
以上でGoogleマテリアルデザインのような検索フォームを作る方法を終わります。
今回は🔍アイコンと❌アイコンを押すことで開閉する検索フォームを作りましたが、🔍アイコンがfocusされると開き、focusが外れると閉じるような検索フォームも面白そうです。

