Reactでモグラ叩きを作る方法です。
Demo
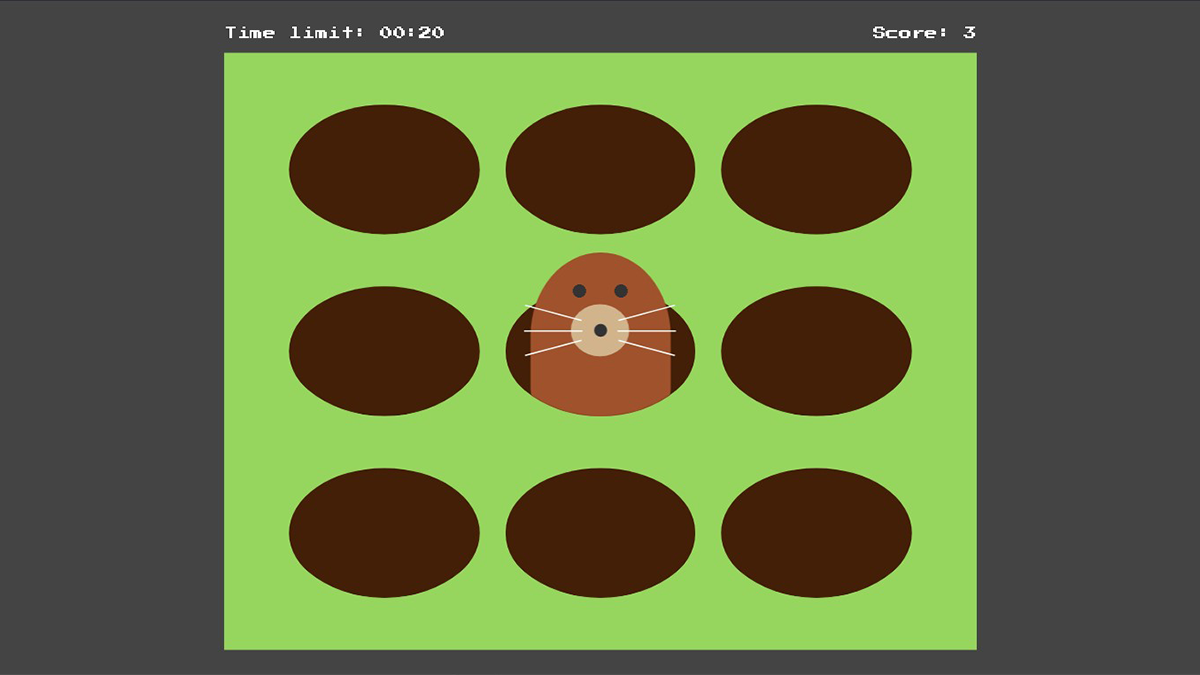
スタートボタンを押すとゲームが開始され、モグラを叩くとスコアが1ポイント加算されます。制限時間に達したところでゲーム終了です。
開発環境を構築する
Reactアプリの開発環境の構築についてはReactの開発環境を構築するをご覧ください。
ディレクトリ構成
src配下を下記の通りにします。現時点でファイルの中身は空です。
whack-a-mole
 └── src
     ├── components
     │   ├── Button.js
     |   ├── ModalWindow.js
     |   ├── Mole.js
     |   └── TextEmergeEffect.js
     ├── hooks
     │   ├── useCountDownTimer.js
     │   ├── useMole.js
     │   └── useMoles.js
     ├── App.css
     ├── App.js
     ├── constants.js
     ├── index.css
     ├── index.js
     └── utils.js
今回は、index.css、index.jsの内容はプロジェクト作成時のままです。
styled-componentsのインストール
ターミナルで以下のコマンドを実行してstyled-componentsをインストールします。
yarn add styled-components定数を定義する
constants.jsにアプリケーション内で使用する定数を定義します。通常、定数は大文字とアンダーバーで定義されます。
export const MOLE_LENGTH = 9
export const MOLE_SPEED = .3

export const APPEARANCE_INTERVAL = 1000

export const MOLE = {
	default: {
		eyes: ['●', '●'],
		complexion: 'sienna'
	},
	hurt: {
		eyes: ['>', '<'],
		complexion: '#f7504a'
	}
}

export const TIME_LIMIT = {
  hour: 0,
  min: 0,
  sec: 10
};MOLEはモグラの基本情報を示すオブジェクトです。プロパティのdefaultは通常のモグラの状態を示し、hurtは叩かれたときのモグラの状態を示します。
ユーティリティ関数を定義する
utils.jsに下記のユーティリティ関数を定義します。
export const createArray = (length, elem) => {
	return new Array(length).fill(elem)
}createArray関数は、引数として配列要素elemとelemの個数lengthを与えると、length個のelemが格納された配列が返ります。
GSAPをインストールする
モグラが顔を出して引っ込む動作と、叩かれたときに沈む動作をアニメーションで表現するため、アニメーションライブラリ「GSAP」のパッケージgsapと、GSAPをReactで使えるようにするパッケージreact-gsap-enhancerを下記のコマンドでインストールします。
yarn add gsap react-gsap-enhancer当初はCSS3のキーフレームアニメーションでモグラの上下の動きを表現しようと試みました。しかし、動いているモグラを叩いたときに、そのタイミングでモグラの動きを止めて、叩かれた位置から元の位置へ沈ませることがCSS3のキーフレームアニメーションではできなかったため断念しました。
グローバルなスタイルを定義する
@mediaや@font-faceなどをはじめ、html要素やbody要素、a要素等アプリ内すべてのコンポーネントに適用する共通のスタイルを定義します。
はじめに、styled-componentsのcreateGlobalStyleを用いて、グローバルなスタイルを持つGlobalStyleコンポーネントを定義します。
import React from 'react';
import { createGlobalStyle } from 'styled-components'

const GlobalStyle = createGlobalStyle`
  @import url('https://fonts.googleapis.com/css2?family=Press+Start+2P&display=swap');

  :root {
    --brand-color: rebeccapurple;
    --accent-color: darkorange;
    --text-color: rgb(40, 40, 40);
    --bg-color: #444;
  }
  * {
    font-family: 'Press Start 2P', cursive;
  }
  body {
    background-color: var(--bg-color);
    display: flex;
    align-items: center;
    justify-content: center;
    height: 100vh;
    -webkit-font-smoothing: antialiased;
    -moz-osx-font-smoothing: grayscale;
    margin: 0;
    overflow:hidden;
    width: 100%;
  }
`;

export default GlobalStylebody要素には主に、アプリを画面中央に配置するスタイルを記述しています。
また、フォントはGoogle Fontsからゲームのフォントに近い「'Press Start 2P'」を使用しています。
作成したGlobalStyleコンポーネントは、Appコンポーネントのビューに次のように追加します。
import React from 'react';
import GlobalStyle from 'components/GlobalStyle'

const App = () => {

  return(
    <>
      <GlobalStyle />
      <div className="App">
      </div>
    </>
  )
}

export default App
ステージを表示する
でははじめに、ブラウザにモグラ叩きのステージを表示します。
import React from 'react';
import styled from 'styled-components'
import { MOLE, MOLE_LENGTH } from './constants'
const StyledApp = styled.div`
padding: 1em;
font-size: 4vmin;
& .stage {
background-color: #96d65e;
display: flex;
flex-wrap: wrap;
padding: 0 1em 1em;
position: relative;
width: 20em;
& .cell {
display: flex;
align-items: end;
justify-content: center;
width: calc(100% / 3);
}
& .hole {
background-color: #431f07;
border-radius: 100%;
display: flex;
flex-direction: column;
align-items: center;
justify-content: center;
height: 4.5em;
width: 88%;
&-mask {
border-radius: 50%;
display: flex;
align-items: end;
justify-content: center;
overflow: hidden;
padding-top: 1em;
position: relative;
width: 100%;
}
}
}
`;
const App = () => {
const moles = new Array(MOLE_LENGTH).fill(MOLE.default)
return(
<>
<GlobalStyle />
<StyledApp>
<div className="stage">
{moles.map((mole, i) =>
<div className="cell" key={i}>
<div className="hole-mask">
<div className="hole">
</div>
</div>
</div>
)}
</div>
</StyledApp>
</>
)
}
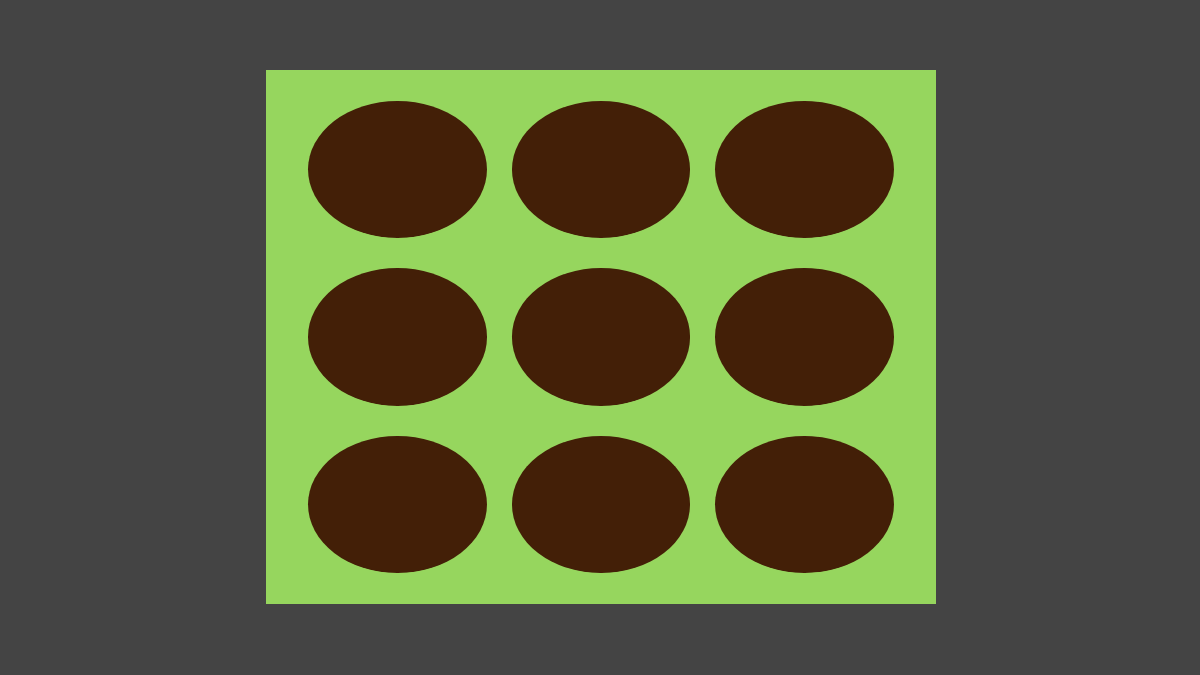
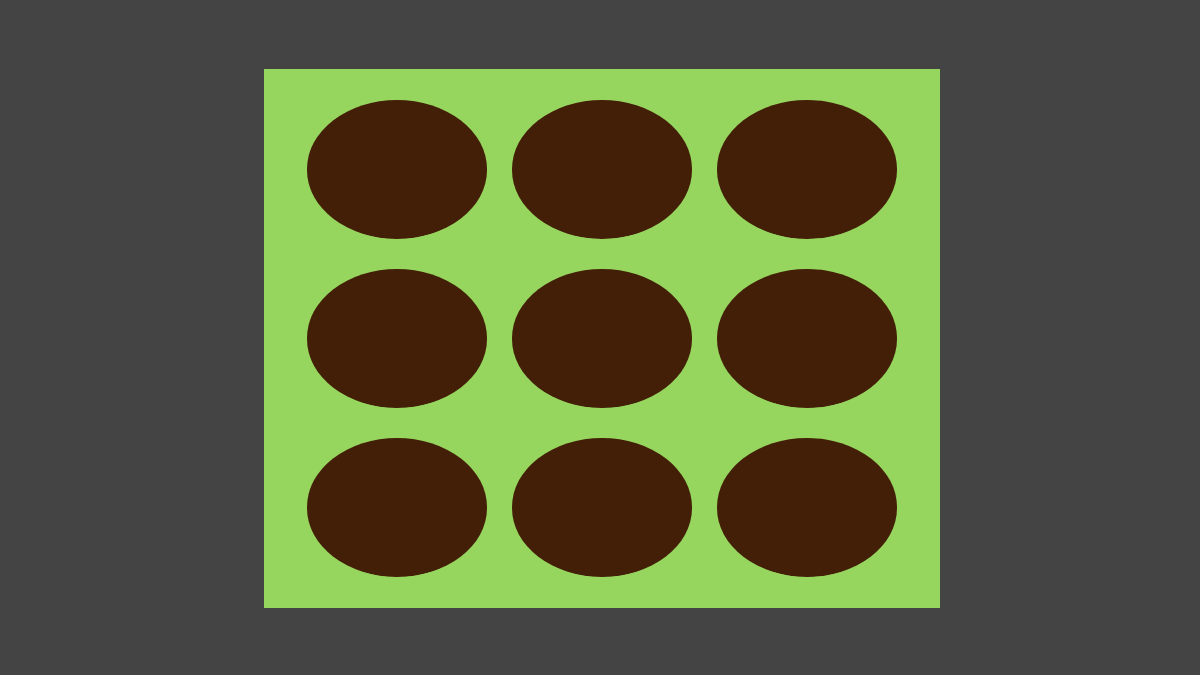
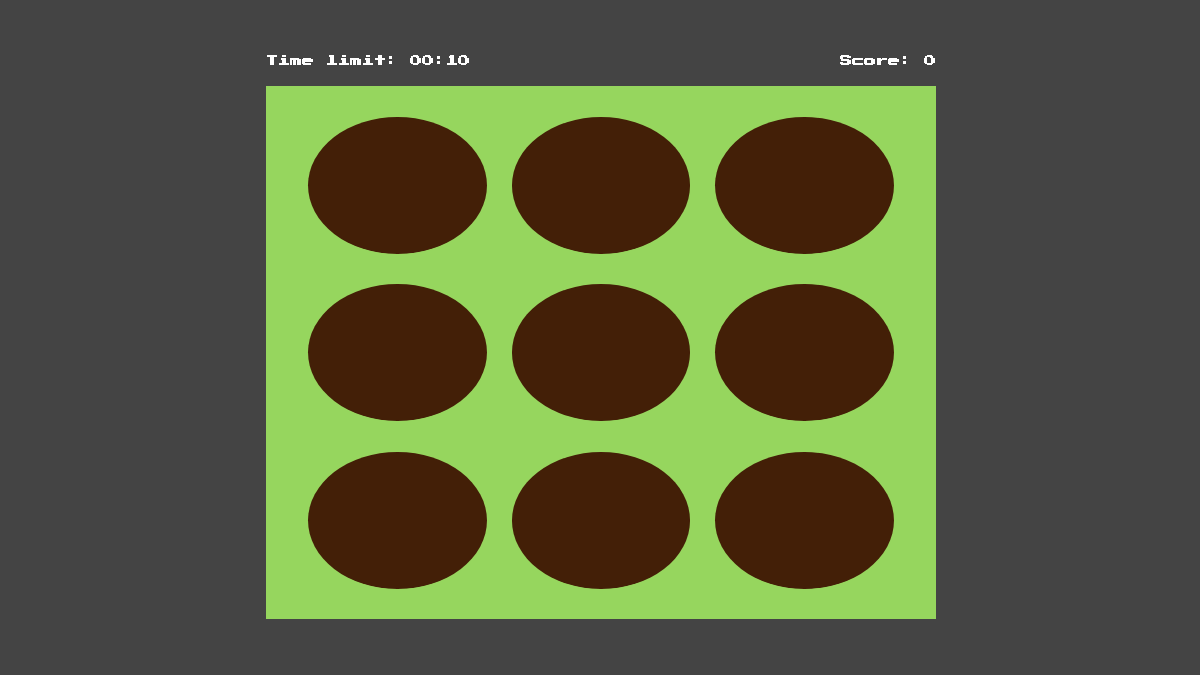
export default Appステージをi個のマス.cellに分割し、そのマス内に穴.holeをMOLE_LENGTH個表示しています。
これにより、ブラウザには次のようなステージが表示されます。
モグラを待機させる
次に、ステージの各穴にモグラを待機させます。
はじめに、モグラを表示するMoleコンポーネントを作成します。
import React from 'react'
import styled from 'styled-components'
const StyledMole = styled.div`
background-color: 'sienna';
border-radius: 50% 50% 20% 20%;
cursor: pointer;
height: 5.5em;
position: absolute;
bottom: -5.5em;
width: 65%;
&::after {
border-radius: 50% 50% 20% 20%;
content: '';
display: block;
height: 100%;
opacity: 0;
position: absolute;
top: 0;
left: 0;
width: 100%;
}
& .mole-eyes {
position: absolute;
top: 1.4em;
left: 0;
right: 0;
}
& .mole-eye {
border-radius: 50%;
color: #333;
font-family: none;
font-size: 1em;
line-height: 0;
position:absolute;
top: 0;
&:nth-child(1) {
left: 1.2em;
}
&:nth-child(2) {
right: 1.2em;
}
}
& .mole-mouth {
background-color: tan;
border-radius: 50%;
display: block;
height: 2em;
position: absolute;
top: 1.8em;
left: calc(50% - (2.4em / 2));
width: 2.4em;
}
& .mole-nose {
background-color: #333;
border-radius: 100%;
position: absolute;
top: calc(50% - .3em);
left: calc(50% - .3em);
height: .6em;
width: .6em;
}
& .mole-whiskers {
position: absolute;
top: 0;
bottom: 0;
width: 100%;
&-left {
left: -80%;
&::before {
transform: rotate(15deg);
}
&::after {
transform: rotate(-15deg);
}
}
&-right {
right: -80%;
&::before {
transform: rotate(-15deg);
}
&::after {
transform: rotate(15deg);
}
}
&-whisker,
&::before,
&::after {
background-color: #fff;
display: block;
position: absolute;
height: .01em;
left: 0;
width: 100%;
}
&::before,
&::after {
content: '';
}
&-whisker {
top: calc(50% - .005em);
}
&::before {
top: .4em;
}
&::after {
bottom: .4em;
}
}
`
const Mole = ({ className, mole, ...props }) => {
return (
<StyledMole
className={`${className} ${className}-${mole.num}`}
{...props}
>
<div className="mole-eyes">
<div className="mole-eye">●</div>
<div className="mole-eye">●</div>
</div>
<div className="mole-mouth">
<div className="mole-nose"></div>
<div className="mole-whiskers mole-whiskers-left">
<span className="mole-whiskers-whisker"></span>
</div>
<div className="mole-whiskers mole-whiskers-right">
<span className="mole-whiskers-whisker"></span>
</div>
</div>
</StyledMole>
)
}
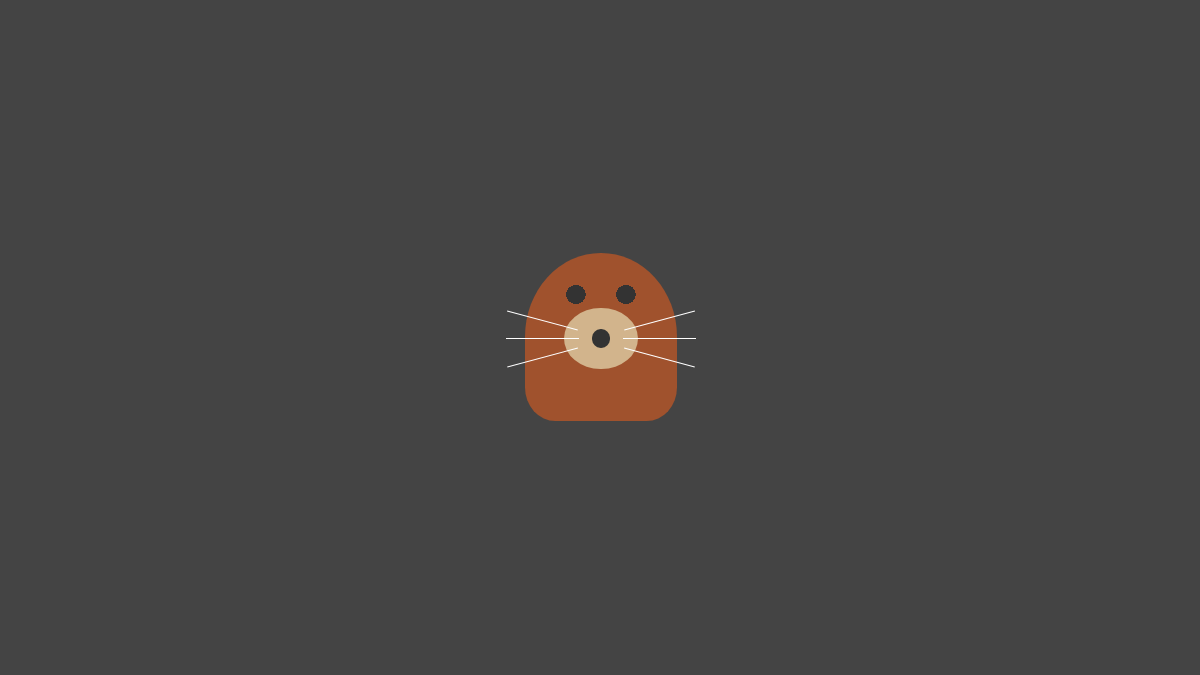
export default MOLEモグラは次のような見た目になります。
そして、Moleコンポーネントをステージの各穴.holeに配置します。
// 省略
import { Mole } from './components/Mole'
const App = () => {
// 省略
return (
<>
<GlobalStyle />
<StyledApp>
<div className="stage">
{moles.map((mole, i) =>
<div className="cell" key={i}>
<div className="hole-mask">
<div className="hole">
<Mole className="mole" mole={mole} />
</div>
</div>
)}
</div>
</StyledApp>
</>
)
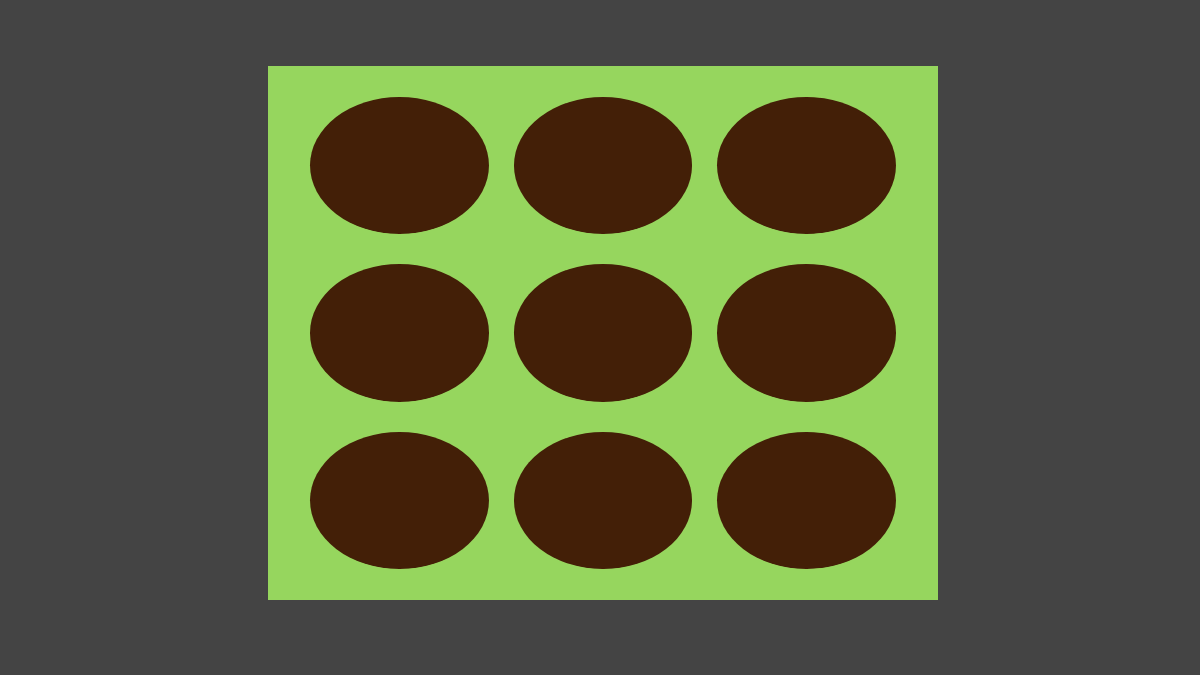
export default Appこれでステージの各穴にモグラを待機させることができました。
モグラをランダムに出現させる
待機させたモグラを、一定の間隔でランダムに穴から出現するようにします。
まず、すべてのモグラに左上から順に番号を割り当てます。
import React, { useState, useEffect, useCallback } from 'react';

// 省略

const App = () => {
  const [moles, setMoles] = useState(createArray(MOLE_LENGTH, MOLE.default));

  const initializeMoles = useCallback(() => {
		setMoles(prevMoles => prevMoles.map((prevMole, i) => ({
			...MOLE.default,
			isMove: false,
			isStruck: false,
			num: i + 1
		})))
	}, [])

  useEffect(() => {
		initializeMoles()
	}, [])

  return (
	  // 省略
  )

export default Appまず、各モグラの状態は頻繁に変化するため、moles配列をステートに書き換えます。
番号の割り当ては、initializeMoles関数内のnum: i + 1のところで行っています。initializeMoles関数は、各モグラを初期化する関数であり、ReactによってAppコンポーネントが初回にレンダリングされた後に一度だけ実行されます。
次に、setIntervalメソッドとMath.randomメソッドを使い、一定の間隔でランダムな値を繰り返し取得後、このランダムな値と同じ番号numを持つモグラを穴から出現させます。
// 省略

import { MOLE, MOLE_LENGTH, APPEARANCE_INTERVAL } from './constants'

const App = () => {
  // 省略

  const intervalID = useRef(null)

  const moveMole = useCallback(num => {
		setMoles(prevMoles => prevMoles.map(prevMole => (
			prevMole.num === num ? {
				...prevMole,
				isMove: true
			} : prevMole
		)))
	}, [])

  const moveMoles = useCallback(() => {
		intervalID.current = setInterval(() => {
			const randomMoleNum = Math.floor(Math.random() * MOLE_LENGTH) + 1

      moveMole(randomMoleNum)
		}, APPEARANCE_INTERVAL)

  useEffect(() => {
		moveMoles()
	}, [])

  return (
	  // 省略
  )

export default AppmoveMole関数の実行でmolesステートが更新され、Appコンポーネントの再レンダーが行われたときに、isMoveプロパティがtrueのmoleオブジェクトを受け取ったMoleコンポーネントを上下に動かします。
// 省略

import GSAP from 'react-gsap-enhancer'
import { TweenMax } from 'gsap'

export const Mole = ({ className, mole, ...props }) => {
  const moleElementRef = useRef(null)

  const runUpDownMoleAnimation = useCallback(() => {
    const moleHeight = moleElementRef.current.getBoundingClientRect().height
		const tween = TweenMax.to(moleElementRef.current, .5, {y: -moleHeight})
		tween.repeat(1)
		tween.yoyo(true)
	})

  useEffect(() => {
		if(mole.isMove) {
			runUpDownMoleAnimation()
		}
	}, [mole.isMove])

	return (
		// 省略
	)
}useEffectフックによって、mole.isMoveがtrueに変更されているときのみrunUpDownMoleAnimation関数を実行し、モグラを上下に動かします。
runUpDownMoleAnimation関数は、TweenMaxによるモグラが上下に動くアニメーションを再生します。
これにより、モグラは次のようにランダムに穴から出現するようになりました。
叩かれたモグラが沈むようにする
モグラを叩いたときに、怯ませて穴の中へ沈むようにします。
// 省略

const App = () => {
  // 省略

  const hitMole = useCallback(num => {
		setMoles(prevMoles => prevMoles.map(prevMole => (
			prevMole.num === num ? {
				...prevMole,
				...MOLE.hurt,
				isStruck: true
			} : prevMole
		)))
	}, [])

  return (
	  {/* 省略 */}

                <Mole
                  className="mole"
                  mole={mole}
                  onClick={() => hitMole(mole.num)}
                />

    {/* 省略 */}
  )

export default AppMoleコンポーネントのonClick属性にhitMole関数を設定したことで、モグラを叩くとhitMole関数が実行され、moleオブジェクトのisStruckプロパティがtrueに切り替わります。isStruckは叩かれたかどうかを示します。
isStruckプロパティがtrueに切り替わると、各コンポーネントの再レンダーが行われるため、各Moleコンポーネントのレンダー後にisStruckプロパティがtrueのmoleオブジェクトを受け取ったMoleコンポーネントが沈むようにします。
// 省略

const Mole = ({ className, mole, ...props }) => {
  // 省略

  const runSinkMoleAnimation = useCallback(() => {
		TweenMax.to(moleElementRef.current, .1, {y: 0})
	})

  useEffect(() => {
		if(mole.isMove) {
			runUpDownMoleAnimation()
		}

		if(mole.isStruck) {
			runSinkMoleAnimation()
		}
	}, [mole.isMove, mole.isStruck])

	return (
		// 省略
	)
}

export default MoleuseEffectフックの第二引数の配列にmole.isStruckを追加し、mole.isStruckがtrueに変更されたときのみrunSinkMoleAnimation関数を実行してモグラを沈ませます。
runSinkMoleAnimation関数は、TweenMaxによるモグラが沈むアニメーションを再生します。
これによりモグラは、次のように叩かれたときに穴の中へ沈むようになりました。
ただ、叩かれても表情を変えないモグラは井上尚弥選手に8RTKOで敗れたアラン・ディパエン選手のようでちょっと不気味なため、通常時と叩かれたときで表情が変わるようにします。
まずは顔色を変えます。
// 省略

const StyledMole = styled.div`
	background-color: ${({mole}) => mole.complexion};

  // 省略
`

export const Mole = ({ className, mole, ...props }) => {
  // 省略

	return (
		<StyledMole
			// 省略

      mole={mole}
		>

			{/* 省略 */}

		</StyledMole>
	)
}StyledMoleコンポーネントがmoleオブジェクトを受け取るようにします。
で、受け取ったmoleオブジェクトのcomplexionプロパティをCSSのbackground-colorプロパティに指定します。これにより、モグラの顔色を通常時と叩かれたときで切り替わるようになります。
次に、目の形が痛がっている様子に変わるようにします。
// 省略

export const Mole = ({ className, mole, ...props }) => {
  // 省略

	return (
		<StyledMole
			// 省略
		>
      <div className="mole-eyes">
				{mole.eyes.map((eye, index) => (
					<div className="mole-eye" key={index}>{eye}</div>
				))}
			</div>

			{/* 省略 */}

		</StyledMole>
	)
}mole.eyes配列をmapメソッドで展開し、中身の要素である左右の目の形を示す2つの文字列をそれぞれ子要素として.mole-eye要素に追加します。
mole.eyes配列はhitMole関数によって、通常時は中身が['●', '●']、叩かれたときは['>', '<']に切り替わります。
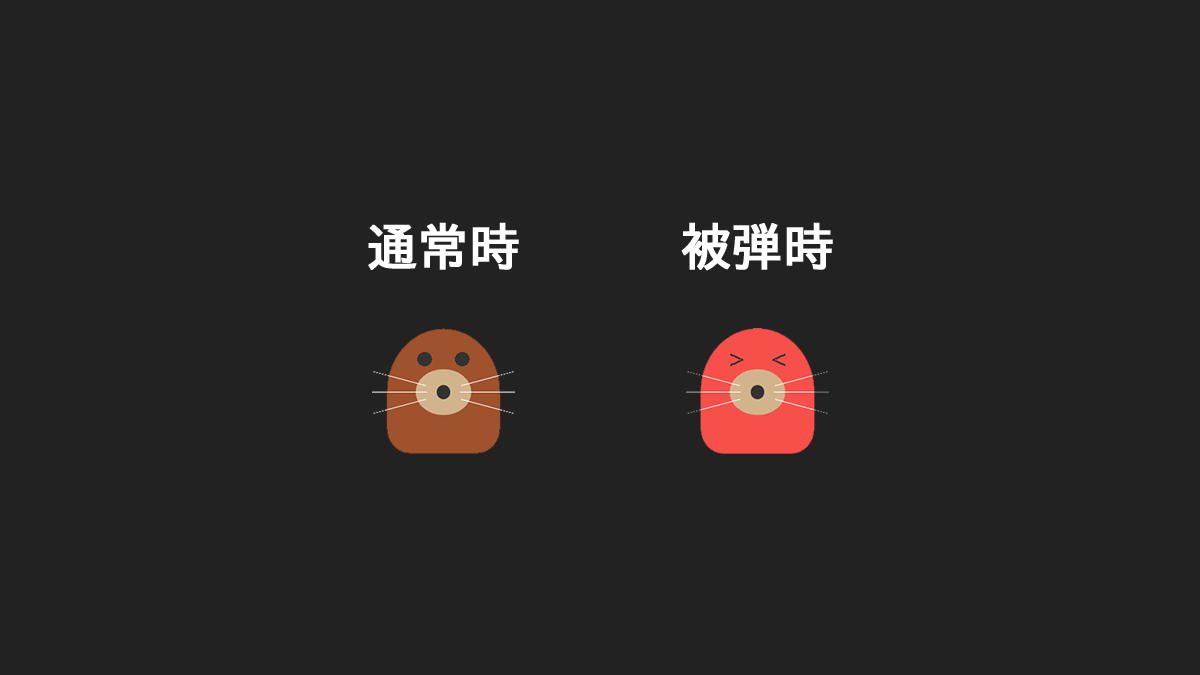
これらの変更により、モグラは通常時と被弾時で下記のように表情が変化します。
下記は実際にモグラを叩いている様子です。

モグラを叩いたときにHit!の文字を表示する
モグラを叩いたときに、モグラの上部に「Hit!」の文字が表示されるようにします。ですが、ただ表示させるのではなく、浮かび上がってすーっと消えるようなエフェクトを加えます。
まず、浮かび上がってすーっと消えるような文字を表示させるTextEmergeEffectコンポーネントを作成します。
import React from 'react';
import styled, { css, keyframes } from 'styled-components'

const emergeAnimation = keyframes`
	0% {
        transform: scale(0.2);
        opacity: 1;
        visibility: visible;
    }
    70% {
        transform: scale(1);
    }
    100% {
        opacity: 0;
        visibility: hidden;
    }
`

const StyledTextEmergeEffect = styled.p`
	animation: ${css`${emergeAnimation} 1s 1`};
	color: white;
    font-size: 1em;
    opacity: 0;
    visibility: hidden;
    text-align:center;
`

const TextEmergeEffect = ({ className, text }) => (
	<StyledTextEmergeEffect className={className}>{text}</StyledTextEmergeEffect>
)

export default TextEmergeEffect
浮かび上がるエフェクトはCSS3のキーフレームアニメーションで表現します。
続いて、作成したTextEmergeEffectコンポーネントをMoleコンポーネントの上に配置します。
// 省略

const App = () => {
  // 省略

  return (
    <>
      <GlobalStyle />
	    <StyledApp>

        {/* 省略 */}

            <div className="hole">
						  {mole.isStruck &&
							  <TextEmergeEffect className="hit-effect" text="hit!" />
							}
              <Mole
                // 省略
              />
            </div>

        {/* 省略 */}

      </StyledApp>
    </>
  )

export default App配置の際、mole.isStruck &&の条件を付けることで、モグラを叩いたときだけTextEmergeEffectコンポーネントがレンダーされるようにしています。
これで、モグラを叩くと次のように「Hit!」の文字が浮かび上がります。
モグラを叩く度にポイントが加算されるようにする
モグラ叩きは、叩いた数を競うゲームであるため、モグラを叩くたびにポイントを加算し、そのポイントをステージ上部に表示します。
// 省略

import GameStatus from './components/GameStatus'

const App = () => {
  // 省略

  // ポイント
  const [hitPoint, setHitPoint] = useState(0)

  // ポイントを加算する関数
  const sumHitPoint = useCallback(() => setHitPoint(prevHitPoint => prevHitPoint + 1), [])

  // モグラを叩いたときに実行する関数
  const knockMole = useCallback((num) => {
     hitMole(num)
     sumHitPoint()
  }, [])

  return (
    <>
      <GlobalStyle />
	  <StyledApp>
       <div className="navigation">
         <GameStatus className="score" title="Score" text={hitCount} />
			</div>
       <div className="stage">
         {moles && moles.map((mole, i) =>
           {/* 省略 */}

             <Mole
               className="mole"
               mole={mole}
               onClick={() => knockMole(mole.num)}
             />

           {/* 省略 */}

         )}
       </div>
    </StyledApp>
    </>
  )

export default AppMoleコンポーネントのonClick属性にknockMole関数を設定することで、モグラが叩かれたときにknockMole関数が実行されてモグラが怯み、さらにsumHitPoint関数によってポイントが加算されます。
ポイントはGameStatusコンポーネントで表示しています。GameStatusコンポーネントはゲームのステータスを表示するコンポーネントです。
import React from 'react'
import styled from 'styled-components'
const StyledGameStatus = styled.div`
font-size: 1em;
`;
const GameStatus = ({ className, title, text }) => (
<StyledGameStatus
className={className}
>{`${title}: ${text}`}</StyledGameStatus>
);
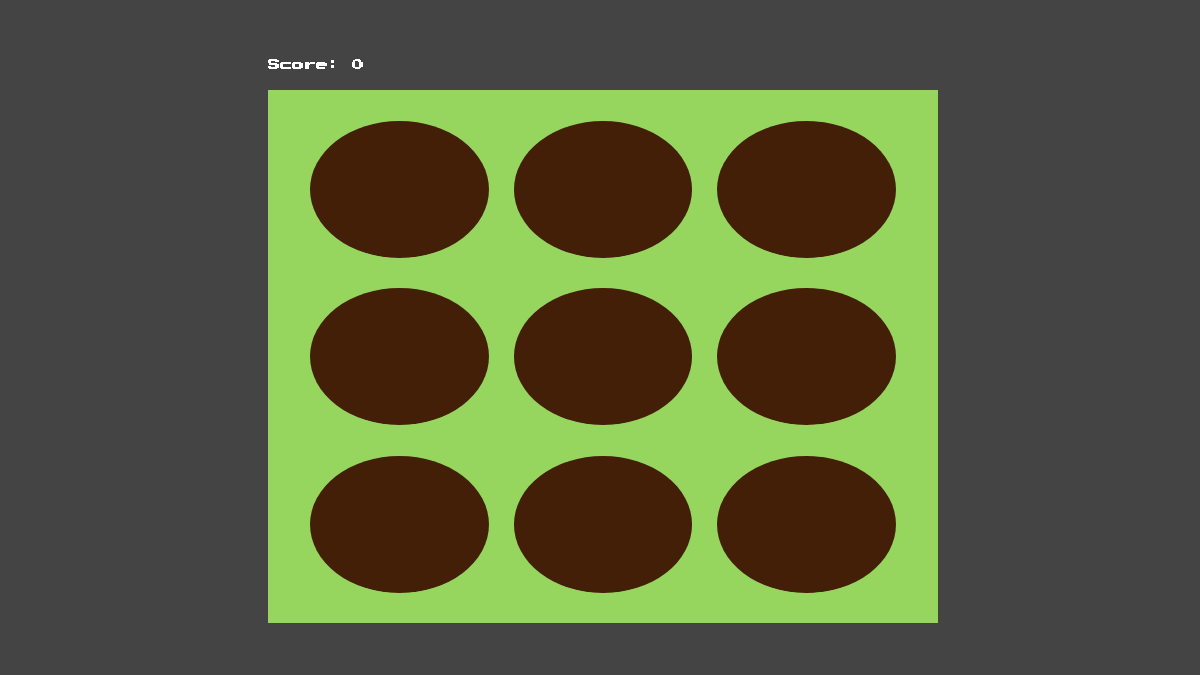
export default GameStatusブラウザには次のように、ステージ上部にスコアが表示され、モグラを叩くたびにポイントが加算されます。
制限時間を表示する
モグラ叩きは、制限時間内にどれだけモグラを叩いたかを競うゲームであるため、ステージ上部に制限時間を表示してカウントダウンさせます。
// 省略

import { MOLE, MOLE_LENGTH, APPEARANCE_INTERVAL, TIME_LIMIT } from './constants'
import useCountDownTimer from './hooks/useCountDownTimer'

const App = () => {
  // 省略

  const [
		timeLimit,
		startTime,
		stopTime,
		resetTime,
		{ isStart, isStop, isTimeUp, isReset }
	] = useCountDownTimer(TIME_LIMIT);

  useEffect(() => {
    startTime();
  }, []);

  return (
    <>
      <GlobalStyle />
	  <StyledApp>
       <div className="navigation">
         <GameStatus
            className="time-limit"
            title="Time limit"
            text={`${timeLimit.min}:${timeLimit.sec}`}
          />
         {/* 省略 */}
			</div>
       <div className="stage">
         {/* 省略 */}
       </div>
    </StyledApp>
    </>
  )

export default AppuseCountDownTimerフックを呼び出し、戻り値のtimeLimitステートをGameStatusコンポーネントのtextプロパティにセットすることで、タイムリミットが表示されます。
更に、startTime関数を実行するとカウントダウンが開始されます。
useCountDownTimerフックはカウントダウンタイマーに関するフックであり、与えられたタイムリミットの初期値を元に、タイムリミットのステートとそれを操作する関数を得ることができます。
useCountDownTimerフックについては、【React】カウントダウンタイマーを作るをご覧ください。
ブラウザには次のようにタイムリミットが表示されます。
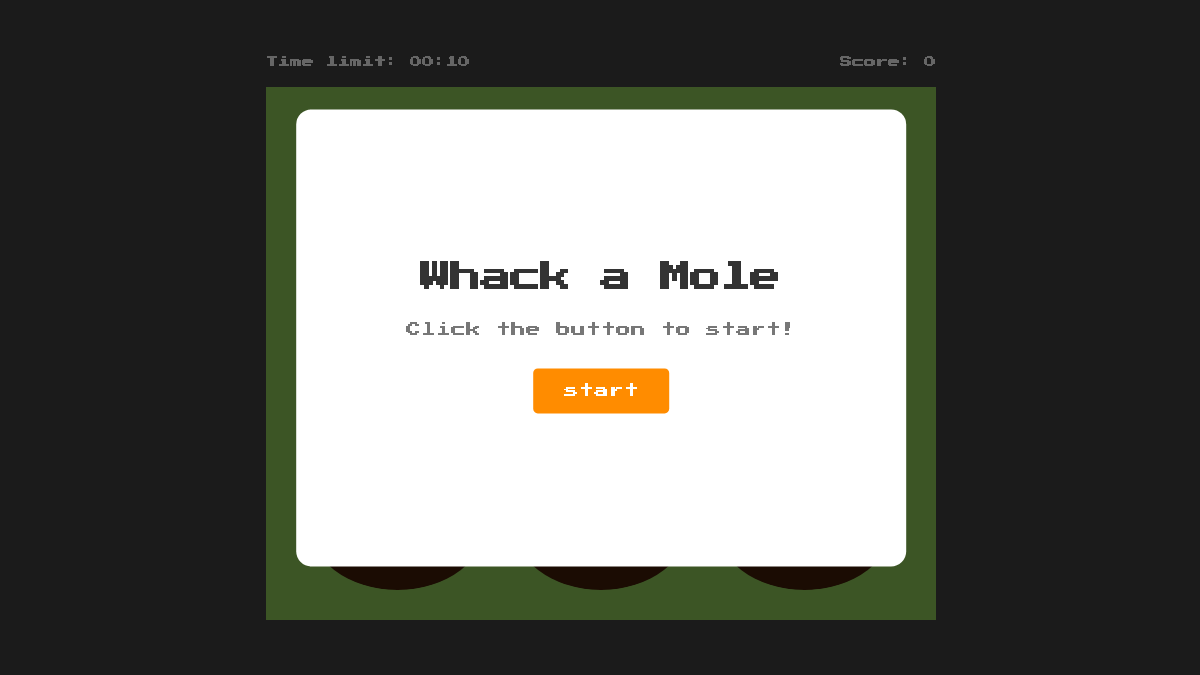
プレイヤーのタイミングでゲームをスタートできるようにする
今のままでは、アプリの表示が完了と同時にゲームが開始されてしまうため、心の準備ができません。
なので、始めにトップ画面を表示し、画面内のスタートボタンを押すとゲームが開始されるようにします。
// 省略

import ModalWindow from './components/ModalWindow'

const App = () => {
  // 省略

  // ゲームを開始していればtrue
  const [isStart, setIsStart] = useState(false)

  // ゲームを開始する関数
  const startGame = useCallback(() => {
		setIsStart(true)
		startTime()
		moveMoles()
	}, [])

  const startBtn = {
    label: "start",
    colors: {
      bg: `var(--accent-color)`,
      text: "white"
    },
    callback: startGame
  };

  return (
    <>
      <GlobalStyle />
	  <StyledApp>
      <ModalWindow
          className="start-modal"
          title="Whack a Mole"
          text="Click the button to start!"
          isShow={!isStart}
          isShowCloseButton={false}
          buttons={[startBtn]}
        ></ModalWindow>
       <div className="navigation">
         {/* 省略 */}
			</div>
       <div className="stage">
         {/* 省略 */}
       </div>
    </StyledApp>
    </>
  )

export default App
モーダルウィンドウはModalWindowコンポーネントで表示します。
ModalWindowコンポーネントについては【React】モーダルウィンドウを作るをご覧ください。
startGame関数をModalWindowコンポーネントのcallbackプロパティに設定することで、スタートボタンを押すとstartGame関数が実行されてゲームがスタートします。
ブラウザには次のようにトップ画面が表示されます。
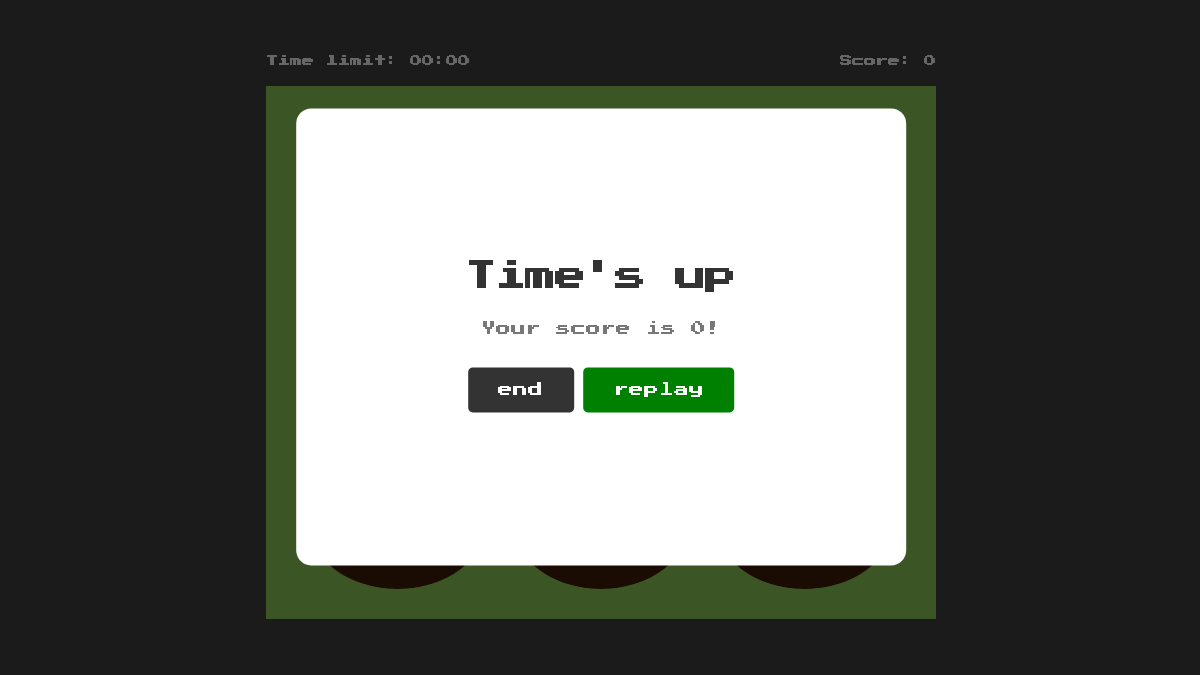
タイムアップ後にすること
タイムアップ後にすることは次の通りです。
- モグラの動きを止める
- カウントダウンを止める
- タイムアップ画面を表示する
ではまず、モグラの動きを止めます。
// 省略

const App = () => {
  // 省略

  // ゲームが終了していればtrue
  const [isStop, setIsStop] = useState(false)

  // 省略

  // ゲームを止める関数
  const stopGame = useCallback(() => {
		setIsStop(true)
		stopMoles()
	}, [])

  // ゲーム開始中にタイムアップしたらゲームを止める
 useEffect(() => {
    if (isStart && countDownStatus.isTimeUp) {
      stopGame();
    }
  }, [countDownStatus.isTimeUp]);

  return (
	  // 省略
  )

export default App
これで、タイプアップするとモグラの動きが止まります。
次に、タイムアップ画面を表示します。
// 省略

const App = () => {

  // 省略

  const endBtn = {
    label: "end",
    colors: {
      bg: "#333",
      text: "white"
    },
    callback: initializeGame
  };

  const replayBtn = {
    label: "replay",
    colors: {
      bg: "green",
      text: "white"
    },
    callback: () => {
      initializeGame();
      startGame();
    }
  };

  return (
    <>
      <GlobalStyle />
	  <StyledApp>

      {/* タイムアップ画面 */}
      <ModalWindow
          className="finish-modal"
          title="Time's up"
          text={`Your score is ${hitCount}!`}
          isShow={isStop}
          isShowCloseButton={false}
          buttons={[endBtn, replayBtn]}
        ></ModalWindow>
        <ModalWindow
          className="start-modal"

          // 省略
        ></ModalWindow>

      {/* 省略 */}

    </StyledApp>
    </>
  )

export default App
タイムアップ画面にはスコアをはじめ、終了ボタンとリプレイボタンを表示します。終了ボタンを押すとトップ画面に戻り、リプレイボタンを押すと再びゲームが開始します。
ブラウザには次のようなタイムアップ画面が表示されます。
コンポーネントのビューとロジックを分離する
コンポーネントの見通しを良くするために、コンポーネントのビューとロジックを分離します。
はじめに、Moleコンポーネントからロジックを抽出し、それをuseMoleフックとして定義します。
import { useCallback, useRef, useEffect } from 'react'
import GSAP from 'react-gsap-enhancer'
import { TweenMax } from 'gsap'

const useMole = (mole) => {
  const moleElementRef = useRef(null);

  const runSinkMoleAnimation = useCallback(() => {
    TweenMax.to(moleElementRef.current, 0.1, { y: 0 });
  });

  const runUpDownMoleAnimation = useCallback(() => {
    const moleHeight = moleElementRef.current.getBoundingClientRect().height;
    const tween = TweenMax.to(moleElementRef.current, 0.5, { y: -moleHeight });
    tween.repeat(1);
    tween.yoyo(true);
  });

  useEffect(() => {
    if (mole.isMove) {
      runUpDownMoleAnimation();
    }

    if (mole.isStruck) {
      runSinkMoleAnimation();
    }
  }, [mole.isMove, mole.isStruck]);

  return moleElementRef;
};

export default useMoleそして、作成したuseMoleフックをMoleコンポーネント内で呼び出し、戻り値のmoleElementRefをStyledMoleコンポーネントのrefに指定します。
// 省略

import useMole from '../hooks/Mole'

// 省略

const Mole = ({ className, mole, ...props }) => {
  const moleElementRef = useMole(mole)

	return (
		<StyledMole
			// 省略

			ref={moleElementRef}
		>
			{/* 省略 */}

		</StyledMole>
	)
}

export default Mole
これでMoleコンポーネントのビューとロジックを分離させることができました。
次に、Appコンポーネント内のモグラたちに関するロジックを抽出し、useMolesフックとして再定義します。
import { useState, useCallback } from 'react'
import { createArray } from '../utils'
import { MOLE_LENGTH, MOLE } from '../constants'

const useMoles = stage => {
	const [moles, setMoles] = useState(createArray(MOLE_LENGTH, MOLE.default))

  const intervalID = useRef(null)

	const moveMole = useCallback(num => {
		setMoles(prevMoles => prevMoles.map(prevMole => (
			prevMole.num === num ? {
				...prevMole,
				isMove: true
			} : prevMole
		)))
	}, [])

	const initializeMoles = useCallback(() => {
		setMoles(prevMoles => prevMoles.map((prevMole, i) => ({
			...MOLE.default,
			isMove: false,
			isStruck: false,
			num: i + 1
		})))
	}, [])

	const hitMole = useCallback(num => {
		setMoles(prevMoles => prevMoles.map(prevMole => (
			prevMole.num === num ? {
				...prevMole,
				...MOLE.hurt,
				isStruck: true
			} : prevMole
		)))
	}, [])

	const moveMoles = useCallback(() => {
		intervalID.current = setInterval(() => {
			initializeMoles()

			const randomMoleNum = Math.floor(Math.random() * MOLE_LENGTH) + 1
			moveMole(randomMoleNum)
		}, APPEARANCE_INTERVAL)
	}, [])

	const stopMoles = useCallback(() => {
		clearInterval(intervalID.current)
	}, [])

	return [moles, moveMoles, initializeMoles, stopMoles, hitMole]
}

export default useMolesで、useMolesフックをAppコンポーネント内で呼び出します。
// 省略

import useMoles from './hooks/useMoles'

const App = () => {
  // 省略

  const [moles, moveMoles, initializeMoles, stopMoles, hitMole] = useMoles()

  return (
	  // 省略
  )

export default App
これでAppコンポーネントからビューとモグラたちに関するロジックを分離することができました。
以上でモグラ叩きは完成です。改善点としては、難易度によってモグラが動くスピードやモグラが一度に出現する数を変えると尚良いでしょう。